Wednesday, July 25, 2018

1984 xl200 speedometer upgrade to an original / Wheel bearings & Brake work

Well, the speedometer on this bike read only in kilometers...

I'm all for some good foreign beers especially when ya have to dig out n read all this metric tools crap - but i draw a line at having to try to convert in my head at 60 mph how dam fast the cop is going to say the kiddo was going.
So, whether this speedo is an actual fur-in 1984 original i can't say because when i turned it over Steve, at GP Racing (on Nevada St, Auburn Ca.) pointed out the mounting bolts had flat bar extensions to enable the bolts to line up to an original mounting bracket...just another day in a life of a modifiers garage i guess.  (click on pics to ZOOM)

The new speedometer addition did come off an original 1984 - fits perfect
and reads MPH... need me a hat -- 'makin' America MPH Again..."

It is bigger than the fur-in one - but that will be easier to read MPH anyway.
in addition it also has in fine print the kilometer per hour reading on the gauge for your squintin' furin exchange student buddies.... (btw, never lend your bike out anyway - I lost a 1949 panhead to a crash n burn that way 40 years ago)


The only problem i see at this point is on the left side there is a turn/knob/ type indicator that appears to be partly broken that zero's out the odometer. i can zero it with needle nose - but i will need to figure out how to extend a functioning knob to zero it via 2 fingers... pulling out needle noose from a pocket at the gas station just doesn't seem like.... I fixed your bike!! have fun guessing when u need your next fill up!.. (fill up- at 160 miles to be on the safe side of 175 max miles to the 2.5 gallon tank)

***********************************************

7/26

Pulled rear tire

makes it easier to clean -
but i also bought new brakes for front and back.
Couldn't break 19mm nut loose even with breaker bars  - so i had to get out compressor and fortunately i have a a zap gun - i mean an impact wrench
...it  took nut right off at 100 psi-


Pretty strange, for this bike, but when i pulled the brake hub out of rim section and measured the pad on them the meat was exact inch/mm/ match as the new ones... so i guess I'll leave 'em on and hold on to new ones til they need changing. (Haven't got to front brakes yet)


 ********************************
7/27
So i saw a video that says wheel bearings should be changed every 2-3 years - depending on your use and weather (mud-rain -dust- amount of use of).
I've got to believe that the owner/s of this bike probably never fixed a thing on it...
The video showed when bike is jacked up you grab the top n bottom of the tire from a side position,  and try to move it back and forth -- if it wobbles - it's past time to change the bearings.
I already had the back tire off - so didn't perform this check - but experiencing the condition of everything else on it I'd bet a 30 pak they haven't been changed in YEARS - so I'm investing the 15 bucks front n back (each) and removing the bearings and replacing them.
Images from places selling them were confusing, and i didn't trust I'd get the correct sets- so
I ordered them from GP Racing on Nevada ST, Auburn- and the owner, Steve, said, when the order comes in to just bring the tires in and he'd show me HOW TO install them. (I can't recommend this owner, and this bike shop more!!!  He usually has several dirt bikes for sale on display too) So,rather than videos to follow,   i'll get some on the job, bearings, training-- further ensuring my kid gets on safe-stable wheels!

The only down side is... i won't be getting a new tool to take the bearing out :) :) Maybe I'll try MAKING the DIY tool i saw several people construct for re seating the bearings...

...did someone say Beertime??
*****************************************


7/26
bunch of pics of inside of gas tank - they didn't turn out - too dark couldn't see inside
but it is packed with rust....  gonna try one more idea to get a couple pics of the inside of tank before it gets a vinegar bath...
https://restoringdirtbikes.blogspot.com/2018/07/1984-honda-xl200r-tank-removal-tip.html

********************
8/9/ 2018 update

took the front forks and frame into GP Racing, on Nevada Street, in Auburn, to be elvaluated last Thursday.
As I suspected their operation wasn't up to par.
Althought forks were not leaking - they had waaaaaaaay to much push play in them- Steve, the owner, said it was almost as if someone didn't put oil in them...  i wouldn't bet against it.
so i'm havening the forks serviced - I've never done it and I'm not putting my kid on anything IFY.
The steering yoke made noise and seemed rough when turned from side to side.
So am having new race-bearing -seals installed also.
I don't have the right size tools to do it - much as i love getting a new tool - butt some things i'm not going to experiment with at 65 miles per hour... not when my kid is the test pilot...

when i get the frame back i'll be cleaning sanding priming painting and clear coating it to a black sheen ...
The OEM 1957 chevy surf green isn't here yet - took them10 days til they bothered to ship it -- and that was a day after i complained that they hadn't notified me yet of a shipment.

The 2 hydro-prints jenn ordered are here tho - guns 100 dollar bill roses n lace

chevy green - black and white ... should be interesting soon.
*******************************

............


Tuesday, July 24, 2018

XL200r side panels repair -- plastic welding reinforcement / decal removals

The side panels are in bad shape.

The one panel is cracked on its face
 
and just under it on reverse side shows that the plastic pin that inserts into a grommet on the bike will probably snap off sooner or later.
Am going to try to reinforce it by using soldering iron to 'weld' in layers of plastic-- using the black plastic spoke covers that didn't work on the tires... or even melting/ building/ in layers of zip ties.


*****************************
9/11/

so i did finally take the leap and used the soldering iron to heat up the cracked pin stub area and using one of the black plastic spoke covers was able to melt it into the side panel in layers; and then i reinforced the whole area in jb plasti weld on top of it all--

(i don't like the white background- gets dirty just by touching - so now i'll be re-painting the backside in black - which will further hide the black weld - tho once it's pushed into the gromet its doubtful to be seen anyway -- daughter might decide green instead....


IT IS the right side panel that covers the battery box - so rather than having to take the side panel off if or when the battery needs charging i am putting in a battery tender cable that can be connected too a charger without needing to pull the side panel off thus weakening the pin fix...


 ****************************************8

I'll just use a heat gun to remove the decals.


After the repairs I'll sand them up
get prepped for sand-able primer - probable etching for a hydro dip print after base paint (a 1957 chevy surf green; paint arrived 8/14)


************
8/8/ update
I haven't worked on the side panel prep yet beyond removing the decals and cleaning the parts.

I
haven't made up mind if I'll attempt to use soldering iron to weave weld the plastic or just try good ole fashioned JB PlasticWeld...  or a combo

******************************
8/15

still haven't got to this repair yet.....
*******************************

Monday, July 23, 2018

1984 xl200r Charging System / testing for good battery by each cell /alternator.stator / regulator /

The bike has only been actually kicked over and started about 4 times, for minutes only, except twice for short test rides - since it was bought.

So a question I've been asked several times when i have called a couple shops to pick their brains is....

is the system 'charging'.

Hell, i don't know... when the lights got dim - i put it on a wall charger.

Does the battery charge up ? Yes.

Does the stator/alternator charge it up? Not sure yet- tho i am reading up on, n watching videos on HOW TO test alternator and regulator.

Here's an original 1984 xl200 regulator i got for 10 bucks - they go for 30-40 n up - so was a good deal
................if it tests GOOD


(BTW, I have received MANY MANY original parts at unbelievable great prices from STEVE at GP Racing on Nevada Street in Auburn. He takes his time, answers all your questions even with bikes sitting behind him waiting his attention - - he'll look up parts - share his knowledge - n because he happened to have an xl200 non-roller at home - he has really made it possible to put this bike back into semi- original condition...  thank you Steve!!

but i digress.
For an AC test i have to start bike -- can't right now as many parts are off bike - including gas tank.

There are some (non starting OHMs tests that can be done tho to determine if those parts are GOOD.
I'll get to those.

Right now i ran a battery check with a volt meter.
If i recall when i last unplugged the wall charger, a week ago, the battery was up around 12.5 volts (which i am understanding from reading does NOT mean it is a good healthy battery)
The reading now before test was 11.9 ... i don't know if that's considered some form of LEAK (since the battery has been OFF the bike - so no 'parasitic' bike-leak caused the drop...

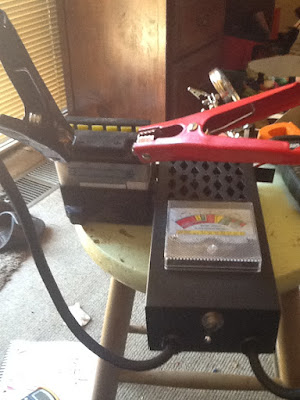
I do happen to own a battery load analyzer that you hook up to battery posts to see the condition of the battery in its sitting state.

 You then click a switch on it and it will put A LOAD thru the battery and re-analyze its state/ condition/ on the meter.

Voltmeter indicated it dropped to 11.27


After running the load test it dropped from 11.9 to 11.2.... still in the green area - but just barely.

The battery fluid looks to be a little on the low LEVEL side - so i may put some distilled water in and recharge... still
i then hit the load button again and it dropped into the "WEAK" area at about 10.8
 
I believe i read anything in the NINE area is not going to be a good motorcycle day if yer out and about.
so
I'm thinking it'll be due for a battery real soon  :(

Forearmed is forewarned... or visa versa

This bike just keeps acting more n more like a boat everyday...


 I got this tiny battery charger for 3 bucks... for out in the boondocks emergency-charging along with a couple small solar cells  - i didnt notice it had a euro plug - so i'll be changing it - plus a lead to solar conversion... it may take 3 days to charge it butt what do you want when yer having fun...
(I'm sure to find something better)

There a couple ways to test EACH cell of the battery to see if one or more are not up to par.

Clean battery off really well so nothing falls into the cells when you remove the caps (if yours has caps and not sealed).
Have a water n bakin soda solution ready for clean up of area / battery/ and tools.

pull the caps.
This is a 12volt battery
so what you want to see is each cell giving you 2 volts...
Before adding distilled water to each cell and re-charging i took readings of each cell.

Hook your red positive lead from volt meter to pos- post.


Then starting in the hole/cell/ closet to the positive terminal - * insert the volt meters black negative lead into the cell... read voltage.
in this case cell number 1 reads 2.10 volts... that's a great cell reading.
#2 cell read / 3.60 ... about .4 low - as you'd like to see around 4 volts
#3 read 5.62 ... again should be around 6

(lets remember as I just did - that i had put a load on this battery TWICE with the analyzer- discharging it)

cell #4 read at 7.03  ... yikes a whole volt low
#5 read at 8.19 ... and we want to see at least a 10


    #6 cell read --  10.65 to10.70
not good.

so having filled cells to correct level w./ distilled water (they looked to be a good 1/4 inch low)  and re-charging- the cells now look good / better/ at 2 volts per cell

#1 reads at 1.72 ...this one dropped from 2.10 ?
#2 at 3.93
#3 at 6.11
#4 at 8.02
#5 at 10.25
#6 at 12.30

............. from here i'll have to see what the readings are in a week - see how well it holds up hanging out on the table... it's not like it's going anywhere...

[Be sure at this point that you dip your test probe lead/s into a bakin soda bath to clean 'em up so they're not toast next time u go to use them.]

There is an additional way to test EACH cell individually that can pin point a low///bad cell:
(see video here: Test each Battery Cell
 

*************************************

alternator and regulator tests to come... here

sooner or later i will track down the sumbitch that is keeping this head light from functioning.

alternator / regulator / connectors / wiring / ground / the answer is there somewhere.


Thursday, July 19, 2018

Jenn working on her 1984 xl200r

update- 7/18

so Jenn was here yesterday to work on her bike remodel- :)


She primed and painted black- a lot of parts -(foot pegs- clutch lever - ect- as she decided the frame will be black in contrast to the OEM 1957 Chevy Surf Green she wants the fenders- tank - and side panels to be.
I had also thought some black spoke covers would look cool (as cleaning up the chrome spokes wasn't great) butt it proved to not work out - as the hub meeting the spokes left them not fitting nicely.
She gave it a valient / persistent/ try to get them to work out tho.


jenn putting black spoke covers on

the hub is preventing the (split down middle) straw like covers from closing and covering bottoms of spokes.
 ...our paint booth

parts are hanging on baling wires - hooked at bottom of wire - looped at the top of box

you can twist/turn/ the wire at top of box to spin the part as you paint
removing parts from bike like foot pegs - clutch lever - brake lever - kick starter - muffler parts ect to clean - prime and paint.
About 3 coats gets them covered well.


...on smoke break

Sunday, July 8, 2018

1984 Honda xl200r - TANK CLEANING -- Stripping- & Paint // & a tank removal tip -

watching some videos on testing the rectifier- regulator for good or bad condition I went downstairs to remove the gas tank so i could get to it and being unfamiliar with the tank's attachment I couldn't figure out if just one bolt held it on or there were others concealed that I just didn't know their location.

TIP:
How can I determine how many bolts are holding this tank in place? And where?

After thinking about it a second I went back up to computer and asked google for 1984 xl200r parts.
(I really need to get a dedicated garage laptop :)

Google returns give you parts sites like bikebandit / partzilla ect.

 Just look in left column n find the gas tank parts list - and badda-boom - it shows in the diagram of parts that there is just the one bolt holding tank in - and a gas line needing disconnected at the on/off petcock.

1984 Honda XL200R FUEL TANK Parts & OEM Diagram


.... easiest thing yet on this bike - one bolt - disconnect gas line - and lifted right off - no problem.


The bike has a 2.7 gallon tank estimated to give 70 mpg / 189 miles max.
...with excellent tune/operating conditions of course.

******************************************
7/23
So the tank is in poor shape ---- so what's new with this thing.

I'm gonna give it an internal CLR-Vinegar bath to get out the 40 years of rust and crud...
then the acid bath will need to be flushed out and neutralized with a distilled water and bakin soda rinse - several rinses probably.
then a compressed blow dry... should be good as new

I tried hard but just couldn't get the right angle to photo the tank guts before the soak - but it was submerged in rust and crud in there... not the kind of stuff you want contaminating your carb and plugging the jets.


(I've read something about an ethanol stabilizer -- i'll look into adding it to fuel after more info;
I also saw several people say to remove petcock when using vinegar - and more who did not and did not suffer leaks afterward -- I'm going to go for NOT removing it - because plenty of people also complain that they then get leaks.... leaks if i do - leaks if i don't -- i choose.... path to least resistance... burrrrp)

Hard to see all the rust floating on top after a 24 hour soak - but it's there.
You can bet there's tons more we won't see til i dump it out.
(click on images to enlarge)
I'll give it another 24 - then dump & do the distilled-baking soda soak n rinses...


************************
7/29 update
...this is just some of the crud & rust i dumped out.

I lost a lot of the rust over the side of bucket by pouring to fast.


I gave it a couple good shots from high pressure nozzle (not very high - i didnt want to blow holes thru it)
and now it is soaking in bakin soda/ distilled water to cut all the acidity inside.

Hasn't shown any LEAKS (so must be some rust holdin' it together :)

At least all this crud won't be -plugging up the carb jets (tho my novice brain reminds me old gas and varnish is a main problem too)
I have no idea if this crap fouls your engine or exhaust... an answer i'll learn as i go i assume.

Once it dried up- it was easier to see the pile of rust that came out of that tank


After inside gut cleanse it'll be time for the outside.
then it'll be time to take Aircraft paint remover to it - get the tank down to the shiny metal...
then it has some dents to fix --- got some bondo work and sanding to do before primer filler - have never used bondo before so this should be another fun experiment.... then more sanding - paint - more sanding -

just another never ending, papa's garage update...
***************************************
8/11/2018

Using Rustoleum  Aircraft Paint Remover


*************************************

8/12 update

Tank needs one more minor application of stripper.
Tank appears to have about 7 dings/dents...
I did get some bondo... but i also bought a paintless/ dent removal kit - that i hope will pull out some of the dings forgoing any bondo work.