So a question I've been asked several times when i have called a couple shops to pick their brains is....
is the system 'charging'.
Hell, i don't know... when the lights got dim - i put it on a wall charger.
Does the battery charge up ? Yes.
Does the stator/alternator charge it up? Not sure yet- tho i am reading up on, n watching videos on HOW TO test alternator and regulator.
Here's an original 1984 xl200 regulator i got for 10 bucks - they go for 30-40 n up - so was a good deal
................if it tests GOOD
(BTW, I have received MANY MANY original parts at unbelievable great prices from STEVE at GP Racing on Nevada Street in Auburn. He takes his time, answers all your questions even with bikes sitting behind him waiting his attention - - he'll look up parts - share his knowledge - n because he happened to have an xl200 non-roller at home - he has really made it possible to put this bike back into semi- original condition... thank you Steve!!
but i digress.
For an AC test i have to start bike -- can't right now as many parts are off bike - including gas tank.
There are some (non starting OHMs tests that can be done tho to determine if those parts are GOOD.
I'll get to those.
Right now i ran a battery check with a volt meter.
If i recall when i last unplugged the wall charger, a week ago, the battery was up around 12.5 volts (which i am understanding from reading does NOT mean it is a good healthy battery)
The reading now before test was 11.9 ... i don't know if that's considered some form of LEAK (since the battery has been OFF the bike - so no 'parasitic' bike-leak caused the drop...
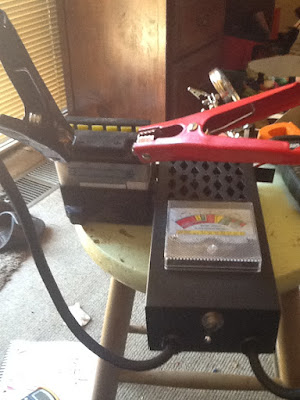
I do happen to own a battery load analyzer that you hook up to battery posts to see the condition of the battery in its sitting state.
You then click a switch on it and it will put A LOAD thru the battery and re-analyze its state/ condition/ on the meter.
Voltmeter indicated it dropped to 11.27
After running the load test it dropped from 11.9 to 11.2.... still in the green area - but just barely.

The battery fluid looks to be a little on the low LEVEL side - so i may put some distilled water in and recharge... still
i then hit the load button again and it dropped into the "WEAK" area at about 10.8

I believe i read anything in the NINE area is not going to be a good motorcycle day if yer out and about.
so
I'm thinking it'll be due for a battery real soon :(
Forearmed is forewarned... or visa versa
This bike just keeps acting more n more like a boat everyday...
I got this tiny battery charger for 3 bucks... for out in the boondocks emergency-charging along with a couple small solar cells - i didnt notice it had a euro plug - so i'll be changing it - plus a lead to solar conversion... it may take 3 days to charge it butt what do you want when yer having fun...
(I'm sure to find something better)
There a couple ways to test EACH cell of the battery to see if one or more are not up to par.
Clean battery off really well so nothing falls into the cells when you remove the caps (if yours has caps and not sealed).
Have a water n bakin soda solution ready for clean up of area / battery/ and tools.
pull the caps.
This is a 12volt battery
so what you want to see is each cell giving you 2 volts...
Before adding distilled water to each cell and re-charging i took readings of each cell.
Hook your red positive lead from volt meter to pos- post.
Then starting in the hole/cell/ closet to the positive terminal - * insert the volt meters black negative lead into the cell... read voltage.
in this case cell number 1 reads 2.10 volts... that's a great cell reading.
#2 cell read / 3.60 ... about .4 low - as you'd like to see around 4 volts
#3 read 5.62 ... again should be around 6
(lets remember as I just did - that i had put a load on this battery TWICE with the analyzer- discharging it)
cell #4 read at 7.03 ... yikes a whole volt low
#5 read at 8.19 ... and we want to see at least a 10
#6 cell read -- 10.65 to10.70
not good.
so having filled cells to correct level w./ distilled water (they looked to be a good 1/4 inch low) and re-charging- the cells now look good / better/ at 2 volts per cell
#1 reads at 1.72 ...this one dropped from 2.10 ?
#2 at 3.93
#3 at 6.11
#4 at 8.02
#5 at 10.25
#6 at 12.30
............. from here i'll have to see what the readings are in a week - see how well it holds up hanging out on the table... it's not like it's going anywhere...
[Be sure at this point that you dip your test probe lead/s into a bakin soda bath to clean 'em up so they're not toast next time u go to use them.]
There is an additional way to test EACH cell individually that can pin point a low///bad cell:
(see video here: Test each Battery Cell
*************************************
alternator and regulator tests to come... here
sooner or later i will track down the sumbitch that is keeping this head light from functioning.
alternator / regulator / connectors / wiring / ground / the answer is there somewhere.


No comments:
Post a Comment